We bring you a guide to installing a wooden decking.
Before starting your project, familiarize yourself with the recommended guidelines for installing wooden terraces to ensure the best possible appearance and durability of the wood. A wooden terrace will become a beautiful feature of your home — you’ll fall in love with it. Evenings and weekends with family and friends will take on a whole new dimension. You can enjoy relaxing moments on your wooden terrace every day! That’s why we’ve prepared a clear, easy-to-follow guide that makes installing a wooden terrace simple. In this guide, you’ll find plenty of valuable advice, from selecting the right base and positioning your terrace, ensuring proper ventilation, recommended spacing for support beams, step-by-step assembly, to tips on surface treatment for your wooden terrace.
Storage of terrace materials before and during installation
During the storage and installation of wooden terraces, ensure that the wood is not exposed to direct sunlight, rain, snow, or other external elements. Although terrace boards are intended for outdoor use, it is not recommended to expose the wood to rain, humidity, or other weather conditions during storage, as this can cause deformation. Store terrace boards and beams on a flat surface above ground level, without direct contact with the soil. Make sure the wood is well covered, for example with a tarp, to prevent water penetration. Ideally, store it in covered, unheated spaces with relative humidity similar to outdoor conditions. Ensure adequate spacing between boards to allow air circulation and prevent mold growth. Failure to follow these recommendations can result in deformation or other damage to the wood during storage.
Preparing the base for wooden terraces
Ensure the base is stable, solid, and level. Plan your terrace project on dry ground that allows quick and natural drying. Provide sufficient space under the terrace for air circulation and drying. The terrace should be situated above the surrounding terrain — do not install it flush with the ground. Wood exposed to high humidity without the possibility of drying will have a shorter lifespan than wood that can dry naturally and quickly. Therefore, ensure free water drainage beneath the terrace so that water does not remain under the boards or substructure. Standing water can lead to warping, deformation, reduced wood lifespan, and increased risk of mold, rot, and wood-destroying fungi.
Avoid direct installation of boards onto the base without substructure support.
Do not place supporting beams directly on the ground, as this reduces the lifespan of the wood. The substructure should be placed on water-resistant pedestals. To increase durability, protective strips or wood impregnation can be applied. Do not place absorbent geotextiles under the terrace, as they retain water and increase humidity, affecting the underside of the wood while the top side is exposed to sun and heat. This can lead to warping, sagging, and reduced wood lifespan. Avoid using softwood beams to support terraces made of hard tropical woods. Plan the terrace surface with a slight slope away from the house, allowing water to run off the boards. This prevents rapid weathering and staining. For balconies, ensure proper rainwater drainage so that natural pigments from tropical wood do not stain the building façade.
Avoid installing the terrace at ground level
Plan your terrace project above the surrounding terrain. The higher the wood is placed above the ground, the better it can dry naturally and maintain proper ventilation. Wood placed at or below ground level, or in areas exposed to unfavorable humidity, will have reduced durability and may encourage mold and rot. Ensure side ventilation and sufficient air circulation under the terrace. Gaps between boards alone are not enough to ventilate or dry the substructure. Terraces installed at ground level are exposed to high soil moisture, which increases wood moisture, causes warping, expansion, deformation, and prevents coatings from properly saturating. Oil can be pushed out of the wood, and coatings may wear prematurely. This installation method is generally not recommended due to its negative effects on wood longevity.
Soil base
If you choose soil as the base for your terrace, prepare a solid, compact, and level gravel or pebble foundation with proper drainage. To prevent weed growth, cover the surface with a non-absorbent membrane. Do not use absorbent geotextiles. If using gravel as the base, ensure it is well-compacted, level, and stable. Do not place beams directly on the soil. Place support beams on tiles or adjustable pedestals to allow drying and ventilation. Never cover substructure beams with soil.
Concrete base
When installing on a concrete base, ensure a proper slope for quick water drainage and treat the surface with a primer due to concrete’s high moisture absorption. Most tropical woods contain natural pigments, which can initially leach out during rain or humid weather and may stain areas beneath and around the substructure.
Support beams
Do not place support beams directly on the ground. The substructure should be positioned on water-resistant pads or pedestals. Adjustable pedestals ensure free water drainage beneath the beams during rain and allow for leveling of height differences. The distance between pedestals should be approximately 50 cm for standard terrace loads. Plan the terrace slope lengthwise away from the house so that water can freely drain from the surface. To increase the durability of the support beams, use protective beam strips from our product range or treat the wood with an appropriate impregnation. For better airflow between the board and the support beam, ventilation pads can be used. Do not use softwood beams for terraces made of hard tropical wood. Proper spacing of the substructure beams is essential — see the table below for recommended distances.
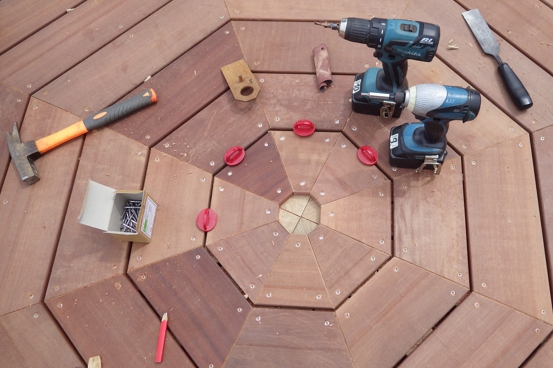
Assembling a wooden terrace
uring the installation of a wooden terrace, it is essential to maintain gaps of 3–7 mm between the boards, depending on the type of wood, to allow for swelling or shrinkage caused by changes in climatic conditions. Use spacer pegs from our product range according to the wood moisture content and local humidity conditions.
.JPG)
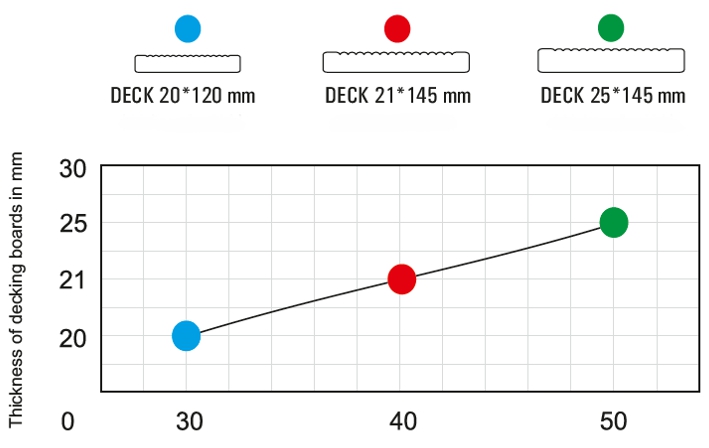
Indicative gap sizes between boards based on wood moisture:
Wood moisture 12–17% → gap size 7 mm
Wood moisture 18–22% → gap size 5 mm
Wood moisture > 23% → gap size 3 mm
To prevent water and moisture from being trapped between the support beams and terrace boards, which could lead to rot, we recommend using ventilation pads from our range.
For leveling boards that are curved or bowed sideways, use a tensioning key or clamp during installation.
Screwing the wooden decking
The strongest way to secure terrace boards is by screwing them from the top. To ensure straight, evenly spaced screw holes, we recommend using a taut string or a drilling template specifically designed for fastening boards to the substructure. Always pre-drill holes for screws, preferably using a countersink bit, to prevent wood from splitting around the screws, stripping threads, or breaking the screws. For the best finish, use a Smart-Bit or Step Drill countersink bit to achieve consistent hole depth. Always attach each board to the support beam at every joint. Place screws on the left and right edges of the board, approximately 2 cm from the edges; never use only one screw in the center of the board. Overlaps at board ends should be no more than 5–10 cm to prevent end bending. Use only high-strength stainless steel screws that are twice as long as the thickness of the boards.
Finishing the wooden deck
If necessary, sand the surface of the terrace with an electric sander to achieve a smoother finish. After sanding, treat the terrace with a suitable protective oil accodring reccomendation of each coating producer.
Surface treatment
Tropical woods intended for outdoor use are very durable and do not require chemical surface treatment. However, applying and reapplying a protective oil or treatment extends the wood’s lifespan, improves surface quality, enhances natural color, and slows down greying. New wood contains natural extractives and has higher density, which can limit the penetration of oils or coatings. Therefore, coatings on new wood are generally less durable than on older wood, where oils penetrate deeper. For exotic woods, it is recommended to apply the first treatment at least 4 weeks after installation, after the wood has weathered and extractives have leached out. Always follow the technical data sheet of the products used.
Regular cleaning and care
Regularly clean the terrace of dirt, debris, and pollen to prevent contaminants from penetrating the wood. Objects placed on the terrace, such as umbrella stands, flower pots, trays, or mats, can trap water and moisture underneath, preventing the wood from drying naturally. This may lead to stains from prolonged moisture and dirt exposure. Periodically move these items or ensure proper airflow underneath to allow natural drying and ventilation. This prevents dark spots from forming on the wood. For more information, refer to the terrace board maintenance guide.