Manual for Wooden Facade Installation
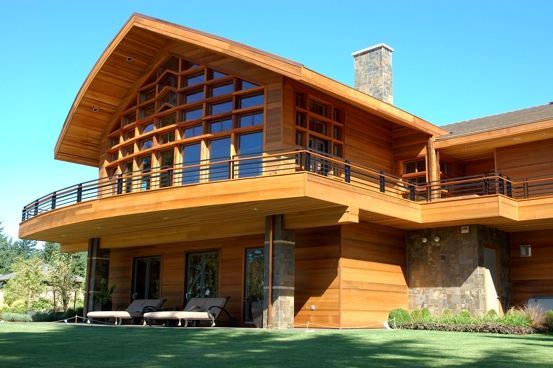
To achieve the best results for your wooden façade project, carefully study the recommended installation procedure before starting. You will find many valuable tips that will help ensure a long lifespan for your wooden cladding. A properly installed wooden façade will give your home a unique character. This natural material impresses with its appearance and surprises with its functionality. Wooden cladding is not only visually appealing, but also offers excellent insulation properties, strength, and durability. In this article, we will explain how to correctly install a wooden façade and provide practical advice on wooden cladding for timber structures, along with the most commonly used installation methods.
Check the Material
Always purchase only high-quality material and make sure you know the quality grade and characteristics of the material you are buying. Before starting the installation, ensure that the cladding meets your requirements. Do not install any product that is damaged or visually unsatisfactory. If you encounter such a product, do not install it and contact your supplier.
Allow the Cladding to Acclimatize Before Installation
Although our façade cladding is designed for outdoor use, it is still a natural material that reacts to its environment. Wood can swell or shrink by absorbing or releasing moisture until its moisture content reaches equilibrium with the surrounding air. Allowing the wood to reach this balance before installation minimizes further movement of the material. The recommended moisture content for the cladding is shown in the table below.
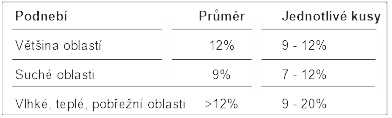
To calculate the average value, test 10% or more of the pieces.
The Following Procedures Are Recommended for Different Types of Cladding
Kiln-Dried Wood Cladding
Cladding made from kiln-dried wood is preferred for its consistency, stability, ease of finishing, and overall quality. These products are typically dried during production to a moisture content of 12–18%. Among all types of cladding, these products are the most suitable for immediate use. If the cladding has not absorbed moisture during transport to the construction site, it can be installed immediately—except in hot and dry conditions, where it is generally recommended to store it in a well-ventilated area for 3 to 5 days before installation. If the cladding has become damp, the boards should be separated and allowed to dry until their moisture content reaches equilibrium with the surrounding environment.
Air-Dried or Pre-Dried Cladding
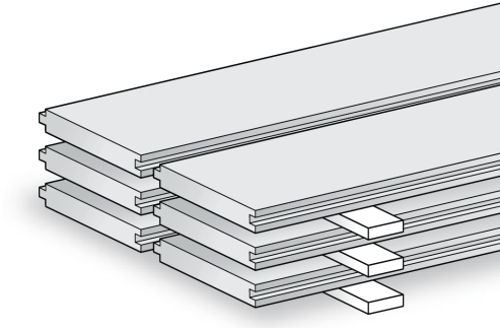
Some types of cladding are air-dried or kiln-dried to a moisture content of approximately 19%. These products must be acclimatized to the ambient conditions by stacking the individual boards vertically with spacers placed at regular intervals in a dry, well-ventilated storage area for 7–10 days. In humid environments, the drying period may need to be extended.
Unseasoned or “Green” Cladding
Cladding made from unseasoned or wet wood that has not been dried prior to delivery requires a longer acclimatization period than seasoned wood. Separate the boards with vertical spacers, keeping two boards side by side, and store them in a well-ventilated, dry area for at least 30 days—or longer in humid conditions.
When purchasing unseasoned cladding, we recommend using profiles such as grooved, beveled, or battens, which are designed to accommodate shrinkage. Narrower boards are also preferable, as they are generally less prone to movement than wider ones.
Please note that the use of cladding made from unseasoned “green” wood is not recommended.
Storage on Site
Before Installation – Storage and Preparation
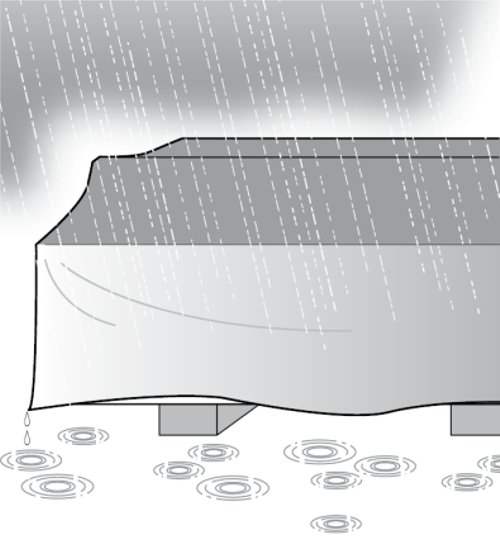
Until the wood is installed, it must be protected from direct sunlight, water absorption, dirt, and other external influences. Store the cladding horizontally above the ground using spacers and moisture protection to prevent absorption from below. Cover it with a waterproof cover that is raised in the middle to avoid water pooling. Do not seal it completely, as proper air circulation is essential. Ideally, store the cladding indoors before installation, for example in a garage. Make sure the wood is placed on beams or pallets and does not come into direct contact with the ground.
Apply a Top Coat Before Installation
Before installation (on-site), it is recommended to apply a top coat to all surfaces, including the end grains. The type of finish should be chosen based on the desired appearance. The top coat protects the wood from moisture absorption and UV damage, helps prevent mold staining, and extends the lifespan of the primer.
Treatment of Cut Ends During Installation
All cuts must be treated with a primer regardless of the season in which installation takes place. The end grain of wooden boards absorbs liquids up to 250 times faster than other surfaces.
100% acrylic latex primers are acceptable if the manufacturer specifies that they provide sufficient protection. Where temperatures drop below 10 °C during application or curing, use an alkyd oil-based wood primer to seal the exposed end grain from cuts made during installation. Boards treated with an alkyd oil primer on the cut ends can be installed before the primer is fully dry, without compromising its effectiveness. Always follow the manufacturer’s instructions for any primer used.
Fastening
Stainless steel fasteners are the best choice—especially if you plan to finish the cladding with a transparent or semi-transparent stain. Other types of fasteners, including electroplated or mechanically galvanized ones, are not recommended. They may corrode, deteriorate, and react adversely with the natural preservative compounds present in wood, causing stains and discoloration.
For Larch cladding, screws are recommended. Nailing is not suitable for Larch wood. Façade profiles up to 22 mm thick, made of cedar or Thermowood, can be fastened using nails.
Placement of Fasteners
Cladding boards must be fastened to each stud or batten with nails or screws spaced no more than 60 cm (24 in) apart (center to center). The exact position of fasteners depends on the type and width of the cladding. As a general rule, each board should be fastened securely while still allowing for natural movement caused by changes in air humidity. Each piece of cladding must be fastened individually.
Fastener Size
The required size of screws or nails depends on the type and thickness of the cladding. Use fasteners long enough to penetrate the wood by at least 30 mm (3 cm) for a secure hold.
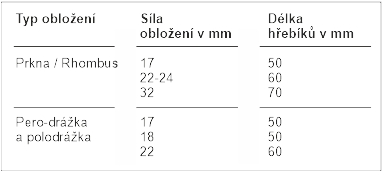
Important: When installing over foam sheathing, add the thickness of the sheathing to the nail length specified in the table.
Moisture Control and Protection Against Humidity
Moisture Emission and Protection Against Humidity
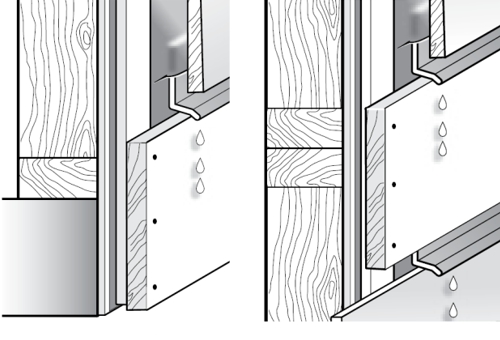
Moisture released from washing machines, dryers, showers, kitchens, and other high-humidity sources—combined with today’s energy-efficient building designs—can lead to the accumulation of water vapor inside the structure. This vapor travels through the building envelope from the warm interior toward the cooler exterior, and if condensation occurs, it may cause damage to the structure, cladding, and surface finishes. A vapor barrier installed on the warm side of the wall helps prevent the movement of vapor but is not completely effective. Any residual moisture must be allowed to escape to the outside. A membrane installed on the exterior side of the cladding helps prevent rain and snow from penetrating the walls while still allowing vapor to escape. It is recommended to build walls with rain-screen protection (see diagram and related section below), especially when installing cladding over rigid foam insulation. 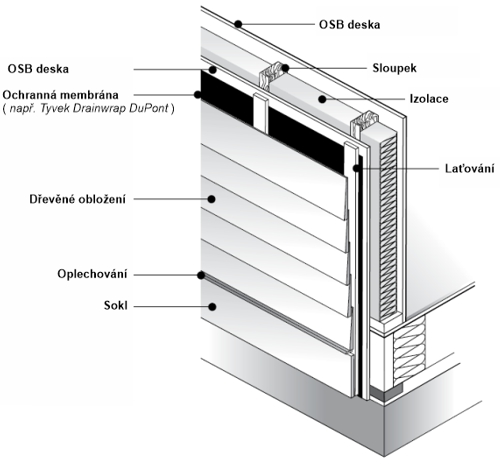 Proper wall construction also includes the use of a building membrane (such as DuPont Tyvek DrainWrap) or building paper that allows vapor to pass through while providing an effective barrier against moisture. These materials are highly effective in preventing problems caused by humidity and condensation.
Wall Construction
Battening
Like any other cladding material, wooden façade cladding performs best when it is properly installed on a suitable substructure. The wooden cladding must be securely fastened with screws or nails to the structural framework, furring strips embedded in plaster, or to the sheathing located between structural members.
Typical stud walls usually require no special preparation for the installation of horizontal cladding. When cladding is installed over a wood-based sheathing material, it should be nailed to the studs or substructure with nails spaced no more than 60 cm (24 in) apart.
For vertical cladding installation, horizontal structural elements (battens) must be spaced at intervals of no more than 60 cm (24 in) to provide adequate nailing support.
Always check your local building codes to verify the applicable requirements for your area.
Size of Battens and Spacing for Timber Frames, OSB Boards, or Masonry Walls
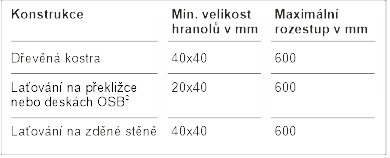
1.) The furring strips must be securely fastened to the studs.
2.) They can be used in humid and demanding climatic conditions to create an air cavity between the cladding and the sheathing (for example, a rain-screen or weather-resistant barrier).
Installation of Rain-Screen Protection
The basic configuration of rain-screen protection, consisting of two layers or partitions separated by an air cavity, can be designed in several variations that offer different levels of protection against rain penetration. It is important to distinguish between drainage cavity walls, simple or open rain-screen systems, and pressure-equalized rain barriers.
The term rain-screen protection typically refers to an exterior cladding system with a cavity behind it that allows for drainage and ventilation to the outside (the inner wall surface includes this air cavity), along with a system of seals or baffles that limit the size of the cavity.
The outer layer deflects the kinetic force of rain, while the inner layer remains protected. The ventilated cavity uses gravity and flashing to direct any water that penetrates the outer wall away from sensitive surfaces and joints. The cavity is wide enough that surface tension and capillary action cannot transport water further inside the structure.
Tips for Constructing a Basic Rain-Screen System:
1.) Drill small holes in the exterior sheathing of the wall (if plywood or OSB sheathing is used) to allow any residual moisture to escape.
2.) Install a protective membrane (such as DuPont Tyvek DrainWrap) or vapor-permeable building paper.
3.) Install vertical battens, ensuring they are aligned with the wall studs.
4.) Install insulation material beneath the ends of the battens. Overlap the insulation over the battens and fasten it to the front side of the battens.
5.) Install the wooden façade cladding onto the battens.
Masonry Walls
Masonry walls require battening for both horizontal and vertical cladding installations. The battens must be thick enough to allow nails to penetrate the wood to a depth of 30 mm (3 cm).
Structural Insulated Panels (SIP)
Structural Insulated Panels also require battening for both horizontal and vertical cladding installations. The battens must be thick enough to allow nail penetration into the wood to a depth of 32 mm (3.2 cm). Typical SIP panels have a nominal sheathing thickness of 13 mm (1.3 cm). A suitable nailing base can be achieved by installing 20 mm-thick battens on the exterior side of the sheathing, spaced no more than 40 cm (16 in) apart.
Installation of Wooden Façade Cladding
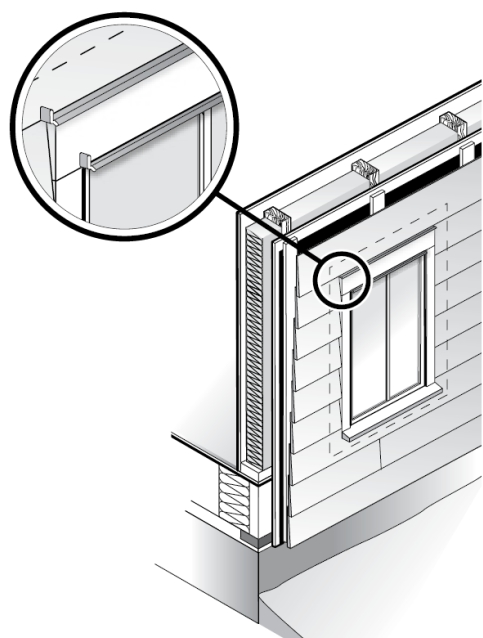
Flashing
Before installing the cladding, ensure that all flashing has been properly fitted to prevent moisture from penetrating the masonry or roof area. Flashing is a crucial component in protecting the structure from water intrusion. It directs water flow away from the building toward designated drainage channels. Horizontal flashing should overlap at all wall penetrations (such as around windows and doors) and at all transitions between different materials or directions of installation (for example, trim boards, water deflectors, or integration with alternative materials). Flashing should always be bent downward to ensure proper water runoff away from the wall. The cladding or trim should terminate approximately 5 mm (½ cm) above the edge of the flashing. At points where flashing meets trim or other materials, do not apply any sealant. Remember that sealant must never be used as a substitute for proper flashing.
Door and Window Flashing
The purpose of door and window flashing is to catch any water that penetrates behind the cladding and direct it outward. Flashing also channels water running down the wall so that it flows away from any wall openings.
Moisture Accumulation Behind Cladding
- Moisture can accumulate behind the cladding as a result of:
- Rainwater penetration through the cladding
- Vapor diffusion
Entry of humid air or condensation from the interior
Sealing
To seal gaps around windows, doors, corners, and other exterior joints exposed to water, use a high-performance sealant based on resin latex, resin, resin silicone, polyurethane, polysulfide, or thermopolymer rubber.
Pure silicone and pure sealants are not suitable for wooden façade cladding and are not recommended. This type of sealing is not a permanent solution and requires regular maintenance.
If seals are not inspected and maintained, they can deteriorate over time, trapping water and causing significant moisture problems. Therefore, do not rely on sealants as the sole moisture barrier.
Do not apply sealant in areas where it could block moisture drainage (for example, below windows or around flashing).
Ground Clearance
The base trim or skirt board must be installed at least 150 mm (15 cm) above ground level.
Tongue and Groove Cladding Installation
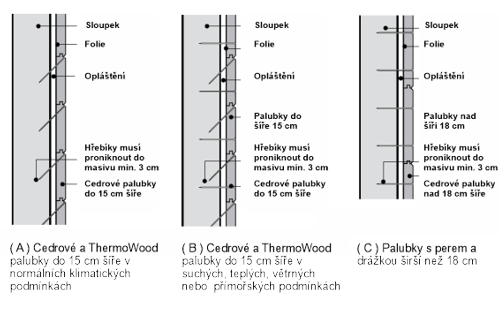
Tongue and Groove Cladding can be installed horizontally or vertically. For horizontal installation, start at the bottom of the wall and work your way upward, making sure the groove edges face downward. Cedar and ThermoWood cladding boards up to 15 cm wide can be secretly nailed or screwed, so that the heads of the fasteners remain hidden. However, the cladding must always be fastened directly to a structural stud. Each nail should pass through the base of the groove. Wider boards can be fastened using two nails per board. All nails or screws must penetrate at least 30 mm (3 cm) into the supporting batten.
For vertical installation, start in one corner with the groove edge facing the adjacent wall. Use a level to ensure the first board is perfectly straight. The groove edge of the first board may need to be trimmed slightly to ensure a perfect fit. The cladding should be fastened to horizontal battens located between the wall studs or beneath the plaster layer. As with horizontal installation, boards up to 15 cm wide can be fastened with concealed nails, while wider boards require visible fastening. For Siberian larch cladding, visible screw fastening is recommended.
Outside and Inside Corners
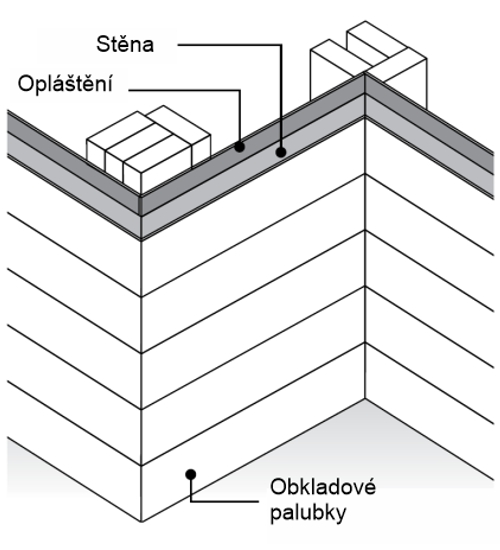
Two main methods are used for finishing outside corners. The choice depends primarily on the desired appearance, but also on the builder’s experience and skill level.
Mitered corners provide a professional, refined look and are most commonly used for horizontally installed cladding (e.g., beveled siding). Mitered corners require precise carpentry skills, as all boards must fit tightly along the full depth of the miter. When this method is used, the board ends are typically sealed with a high-quality sealant.
Corner boards are a popular and easier alternative to mitered joints. The thickness of the corner board depends on the cladding thickness, typically ranging from 19 to 31 mm (1.9–3.1 cm). The width depends on the builder’s preference and aesthetic proportions. Corner boards are installed over the sheathing, with the cladding butted tightly against the narrow edge of the boards. Joints should be filled with sealant during cladding installation. Corner boards and cladding ends are nailed to the corner studs, ensuring a durable, low-maintenance connection. Designing roofs with extended eaves that protect the corners from weather exposure also helps create long-lasting joints. Always apply primer or stain to all cut edges. Corner boards can be installed beside or over the cladding, as shown in the diagrams.
Trim Technique
If experience or other factors make the mitered corner technique impractical, trim boards (approx. 50×50 mm) can be used to finish inside corners. They may also be fastened to adjacent walls, covering the joint with a trim piece. Outside corners can likewise be covered with inserted profiles or external trim boards.
Joining Boards
When joining cladding at corners with trim boards, cut the edges at a 45° angle to create a proper overlapping joint. This is especially important for vertically installed cladding. Ensure that all joints are positioned on studs or battens, and that each nail penetrates at least 30 mm (3 cm) into solid wood.
Installation Guidelines
All installers must be familiar with and follow best installation practices to ensure high-quality work and minimize warranty claims.
Recommended:
- Follow local and national building codes.
- Use construction methods that promote drainage and reduce water accumulation.
- Apply the top coat as soon as possible, ideally before installation.
- Always seal all cut ends.
- Allow the cladding to acclimatize before installation.
- Use stainless steel fasteners only.
- Ensure fasteners penetrate at least 30 mm (3 cm) into the substrate or sheathing.
- Position joints over solid wood for secure nailing.
- Use mitered joints where two boards meet.
Not Recommended:
- Exposing wooden cladding to weather for more than 2 weeks before applying the top coat.
- Using electroplated or mechanically galvanized nails that do not meet ASTM A153 standards.
- Fastening cladding directly to insulation only.
- Nailing through two layers of cladding.
- Leaving cut ends unsealed.
- Attempting to nail through miters or overlaps “blindly.”
- Installing or painting wet cladding.
- Using sealant instead of flashing.
- Installing cladding in direct contact with concrete, masonry, decks, porches, or roofs.
Disclaimer
The information provided above summarizes the most commonly used techniques and practices for installing wooden façade cladding on timber-frame buildings in North America and Canada. Installation methods may vary depending on the specific project. Always follow local building regulations and codes, which take precedence over the recommendations listed above.